An existing Google Cloud Platform account is required before you proceed.
To deploy a cluster in your Google Cloud Platform (GCP) account with Kublr, you’ll need to create a GCP service account and a private key.
How it can be done - see this article Create a Service Account for the Custom Role
We’ll outline the needed steps to create a Kubernetes cluster on GCP with Kublr. Then, we’ll deploy a simple application (WordPress).
Log into Kublr using your credentials.
On the left menu, click Credentials.
Click Add Credentials.
 The ADD CREDENTIALS dialog is displayed.
In the ADD CREDENTIALS dialog, set Credentials Type to “GCP Credentials”. The dialog is updated to display the Google Cloud Platform credentials specific fields.
Enter Credentials Name.
Set:

Click Save Credentials. The “Credentials have been successfully created.” popup is displayed.
To verify if credentials are valid and ready to be used, mouse over the created credentials and click the displayed Test button.
Verification success popup will be displayed.
Click Ok.
To add a new cluster:
On the left menu, click Clusters.
Click Add Cluster.
 The Select Installation Type dialog is displayed.
In the Select Installation Type dialog, select Platform or Cluster.
Click Continue Setup.
 The add cluster/platform dialog is displayed.
Set Provider to “Google Cloud Platform”.
From the Credentials list, select previously created GCP credentials.
If credentials were not created previously, use Add New Credentials.
Specify Cluster Name.
Set:

Optionally, set Advanced Options.
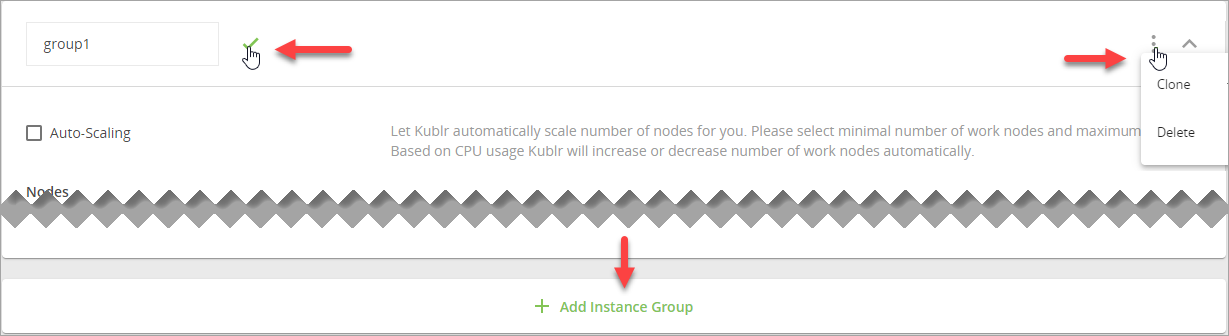
Use the INSTANCES tab to set:

Note For your working nodes, you can have as many instance groups as you need (clone or delete the current instance group, or add another one). If necessary, give specific name to each group.
Use the FEATURES tab to select and configure FEATURES that you want to include into your cluster.

Click the REVIEW & CREATE step.
Review your cluster parameters.
At the bottom of the dialog, click CONFIRM AND INSTALL.
A notification is displayed “Your cluster is being created. It might take a few minutes.”
In the notification window, click OK.
Your new cluster page is displayed on the Events tab showing the cluster creation progress.
For detailed instuctions, see the Install and Set Up kubectl article in Kubernetes documentation.
For Mac users:
curl -LO https://dl.k8s.io/release/$(curl -L -s https://dl.k8s.io/release/stable.txt)/bin/darwin/amd64/kubectl
chmod +x ./kubectl
sudo mv ./kubectl /usr/local/bin/kubectl
For Windows users:
To download kubectl v.1.24.0, click this link.
Include the path with the kubectl executable to PATH environment variable.
For more information about adding tool locations to PATH variable, refer to this article in Microsoft documentation.
See additional information in the Install and Set Up kubectl article in Kubernetes documentation.
To retrieve the config from Kublr:
For Mac users:
mkdir ~/.kube
cp ~/Downloads/config.yaml ~/.kube/config
For Windows users:
cd %HOME%
mkdir .kube
copy %HOME%\Downloads\config.yaml .kube\config
Check that kubectl is working and using right config file:
kubectl config view
kubectl cluster-info
Below is the example of how to deploy a simple application (WordPress) into your cluster using Helm.
Install Helm Click here for detailed guidelines.
For Mac users:
curl https://raw.githubusercontent.com/kubernetes/helm/master/scripts/get > get_helm.sh
chmod +x get_helm.sh
./get_helm.sh --version v3.15.4
For Windows users:
NOTE: It may take a few minutes for the LoadBalancer IP to become available.
helm install bitnami/wordpress --generate-name
For Mac users:
export SERVICE_IP=$(kubectl get svc --namespace default wordpress-wordpress -o jsonpath='{.status.loadBalancer.ingress[0].hostname}')
echo http://$SERVICE_IP/admin
echo Username: user
echo Password: $(kubectl get secret --namespace default wordpress-wordpress -o jsonpath='{.data.wordpress-password}' | base64 --decode)
 Open the browser and navigate to the URL from console output.
For Windows users:
kubectl get svc --namespace default wordpress-wordpress -o jsonpath='{.status.loadBalancer.ingress[0].hostname}'
kubectl get secret --namespace default wordpress-wordpress -o jsonpath='{.data.wordpress-password}
